WHATSAPP INTEGRATION
REQUIREMENTS:
- In order to use the WhatsApp integration, you must be subscribed to the SMS module.
- To integrate with WhatsApp services, you must first create a Facebook Developer Account.
- You will need a WhatsApp Business Account to be able to utilize the WhatsApp API endpoints.
IMPORTANT NOTES:
- Currently, the integration with WhatsApp only supports text. It doesn't support images, videos, or file transfers.
- Once you convert your phone number to a business phone number during the setup process, you won't be able to switch it back.
- Finally, once you integrate your phone number with eimmigration, you'll no longer be able to view these messages from within your WhatsApp application on your computer or mobile device.
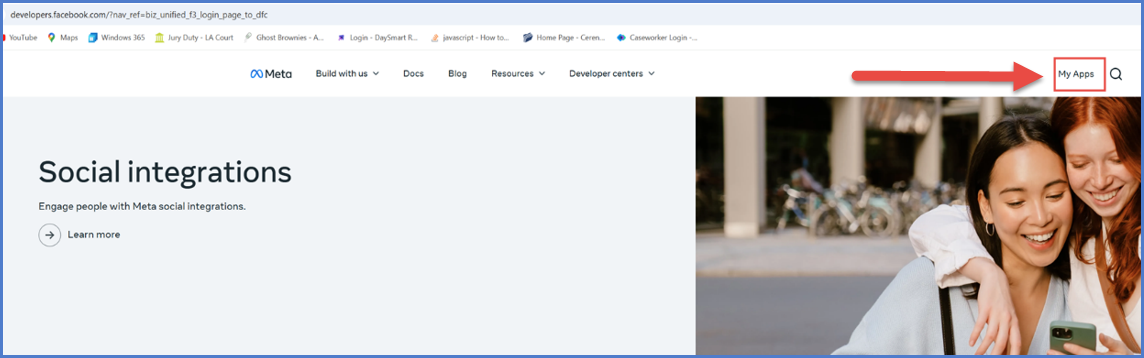
CREATING A FACEBOOK DEVELOPER ACCOUNT
- Visit https://developers.facebook.com
- Log in using your personal Facebook account.
- Accept Meta’s terms and conditions by clicking Continue.
- Verify your account by adding your mobile number.
- Follow the prompts to complete developer account setup.

CREATING AN APP
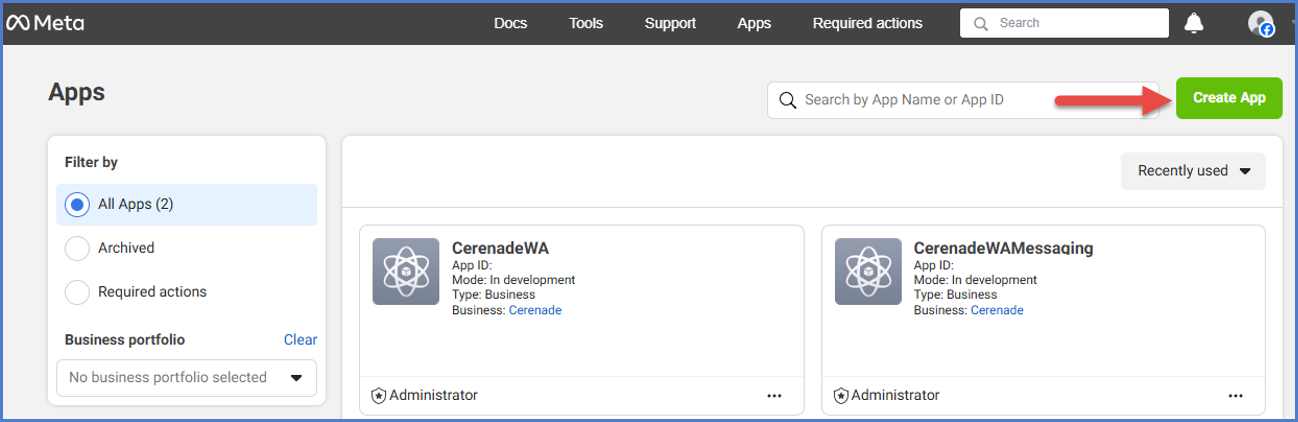
- Go to My Apps in the top menu.
- Click Create App.
- Fill in the App Name and Contact Email.
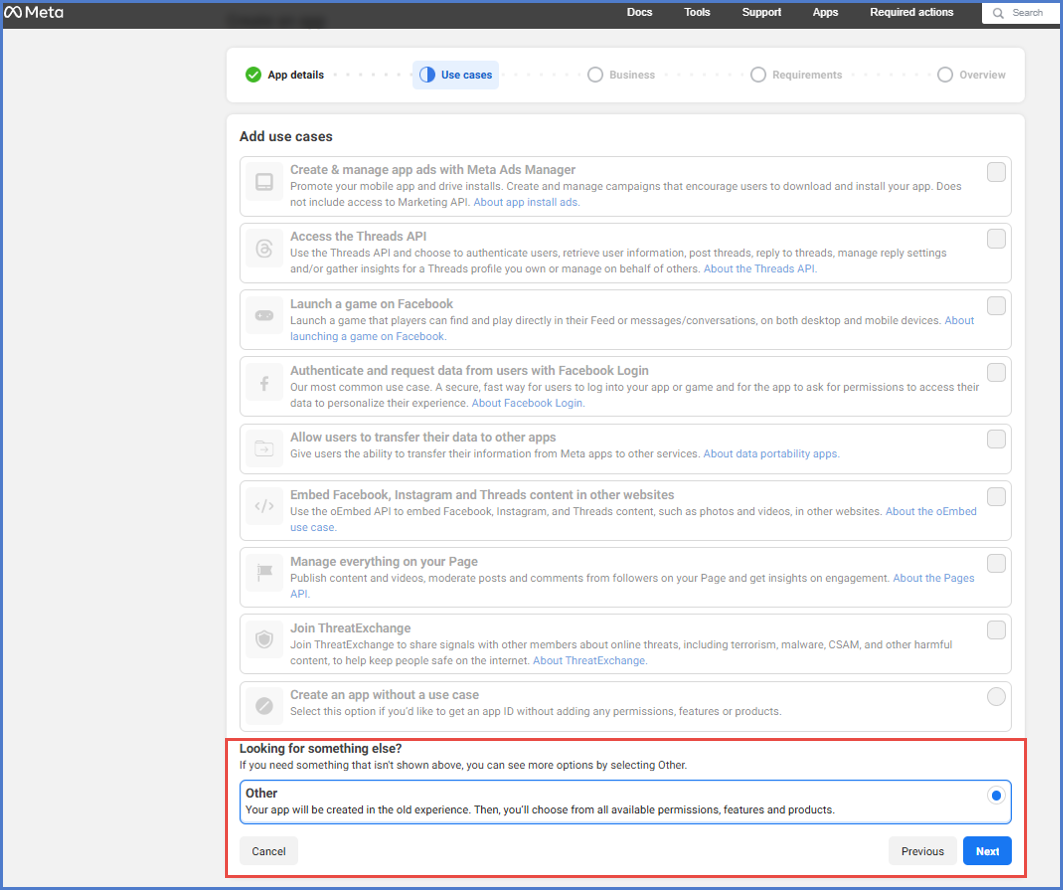
- Choose Other as your use case.
- Select Business as the app type.
- Associate your app with a Meta Business Account (create one if you don’t have it yet, otherwise move to the next section).
- Go o to https://business.facebook.com
- Create a Business Manager.
- Fill in your business details.
- Complete Business Verification (this can be done later).
- Submit supporting documents and verify your business phone number (can also be done later).
SET UP WHATSAPP IN YOUR APP
- In the Add Products to Your App section, find WhatsApp and click Set Up.

- You'll be redirected to the Quickstart tab.
- You’ll receive a free test number and pre-approved message templates for testing.
- With this, you'll be able to:
- Send/receive test messages using the WhatsApp API.
- Connect your own number.
- With this, you'll be able to:
PROVIDE REQUIRED DETAILS IN EIMMIGRATION ADMIN PORTAL
-
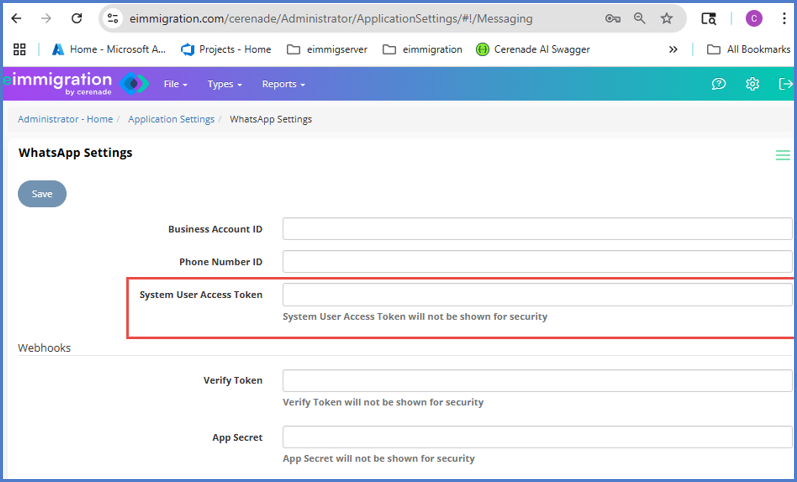
To use WhatsApp messaging in eimmigration, navigate to the Admin Portal → Application Settings → Messaging Tab and fill in the following:
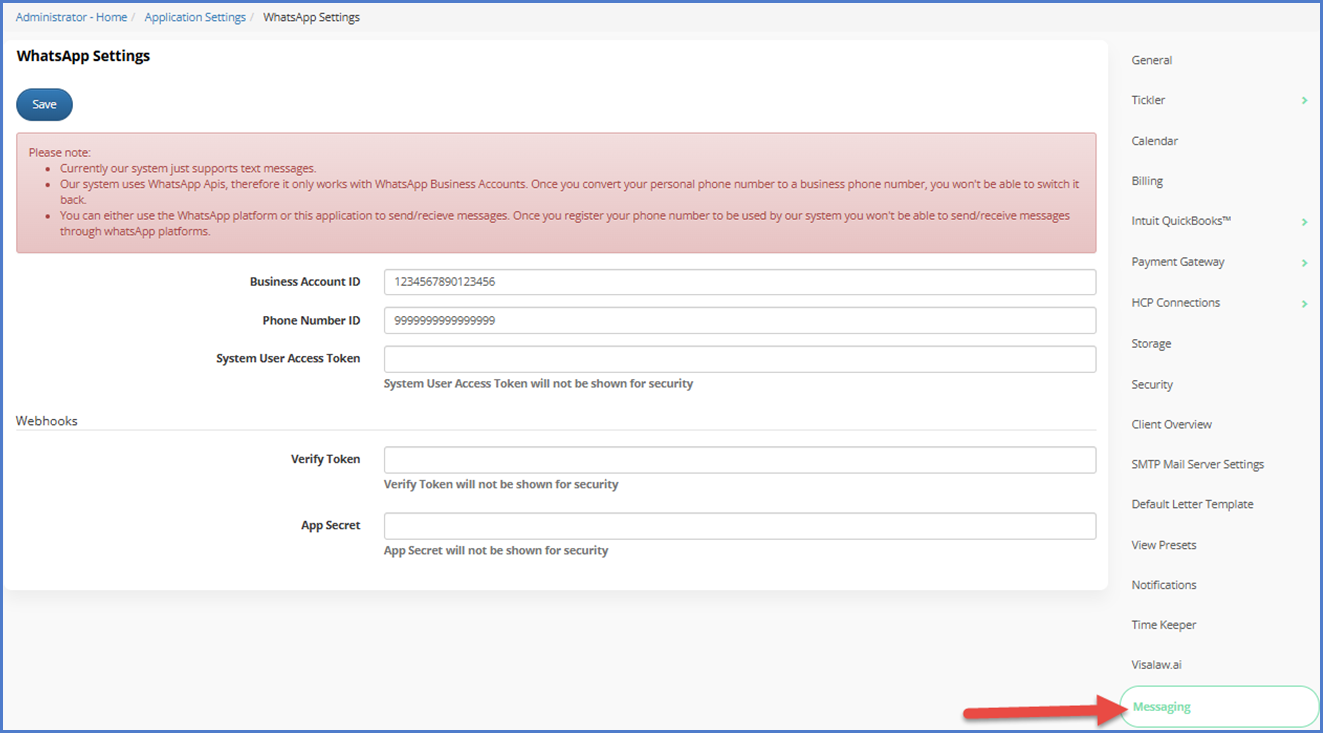
- Business Account ID
-
Go to the API Setup tab in your developer account and look for WhatsApp Business Account ID.

-
- Phone Number ID
- You need to connect your own number. To send real messages you first need to verify your business. First, go to your Meta Business Settings at business.facebook.com/settings.
- Under Security Center, click Start Verification.
- Submit the required business documents.
- Once verified, connect your phone number.
- Set up a Payment Method.
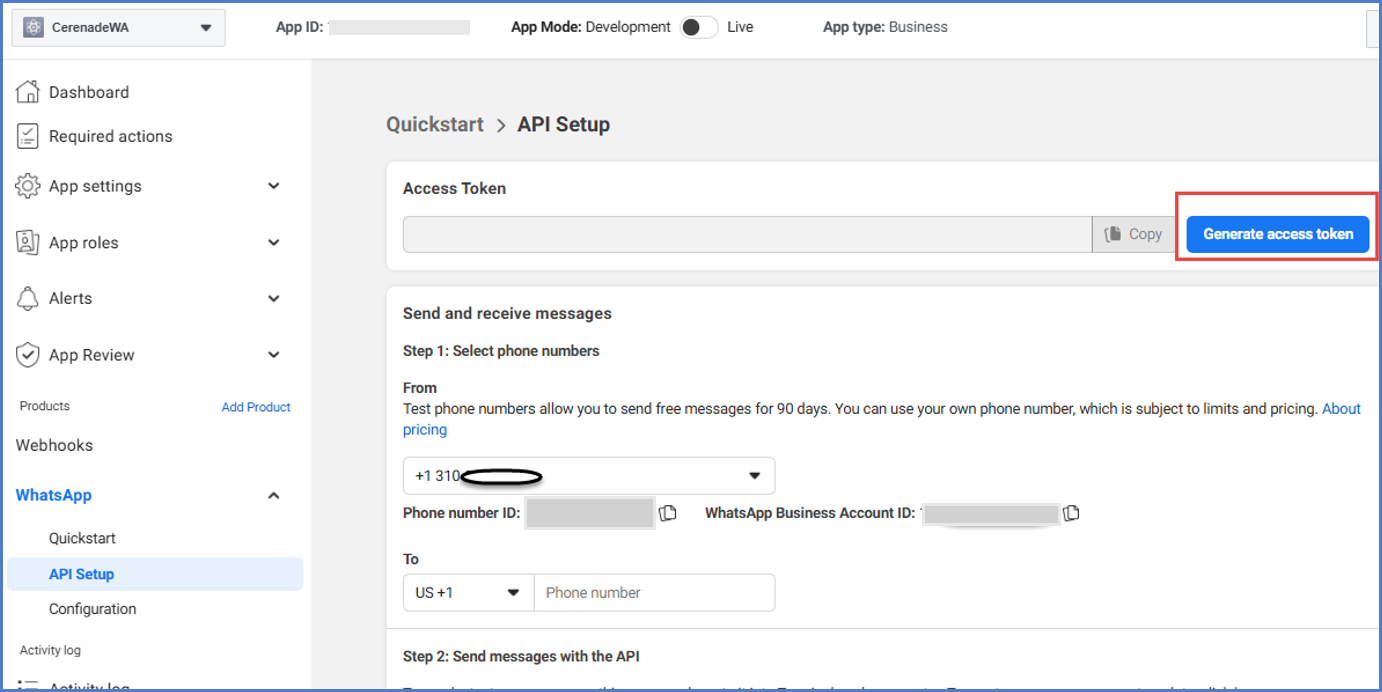
- To add your number, go to your developer account>API Setup.
- Expand the From drop-down list.
- Click on Add Phone Number.
- System User Access Token
- Verify Token
- App Secret
- Business Account ID
LOCATE REQUIRED IDENTIFIERS
- Go to the API Setup tab in your developer account and look for WhatsApp Business Account ID.

- Enter your WhatsApp Business Display Name (must comply with Meta’s naming policies and WhatsApp Business Messaging Policy)
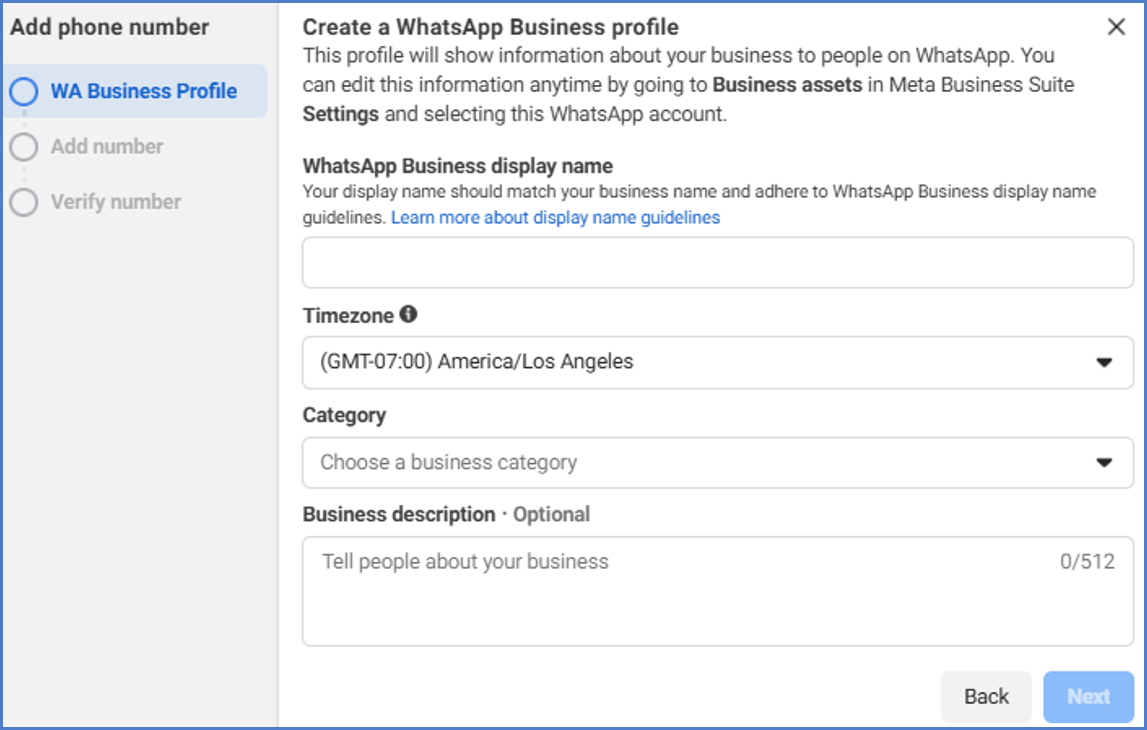
- Enter and verify your phone number via SMS or phone call (you’ll get a 6-digit code).
-
Once verified, your display name will appear under:
-
Settings > Accounts > WhatsApp Accounts
https://business.facebook.com/latest/settings/whatsapp_account/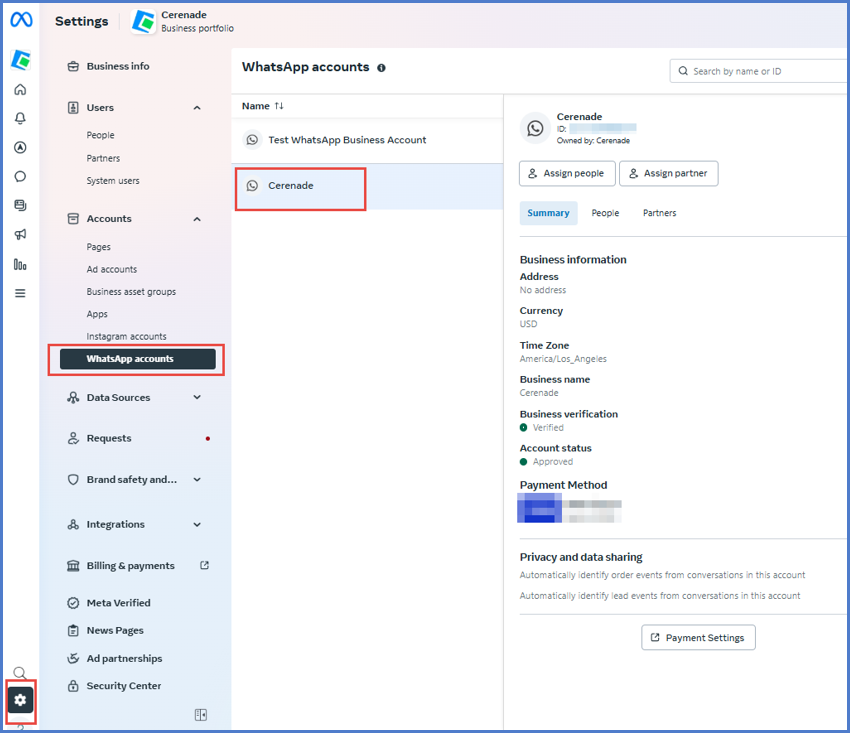
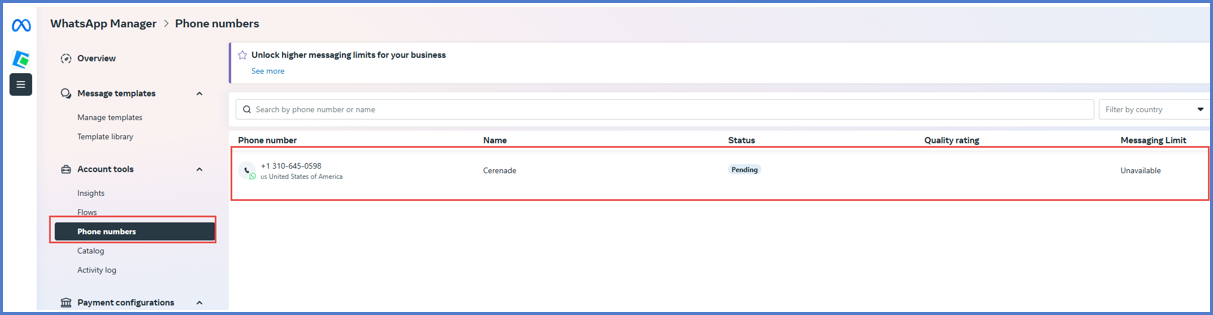
- Your phone number will show under the Phone Numbers tab in WhatsApp Manager in your WhatsApp business account.
-
If your phone number status is still pending:
- Generate a token for the new number in your Developer Account and link it to your business manager.
- Choose “Opt in to all current and future WhatsApp Accounts”, click Continue, then Save.
- Refresh the page in WhatsApp Manager → Phone Numbers to confirm the connection.
-
Once your phone number is connected you can choose it from the “From” dropdown in your API setup page, and find the “Phone Number ID” and copy it into the corresponding field in Admin Portal > Application Settings > Messaging tab.
- Generate a token for the new number in your Developer Account and link it to your business manager.
-
-
SYSTEM USER ACCESS TOKEN
- Visit: https://business.facebook.com/latest/settings/
- Under Users, click System Users
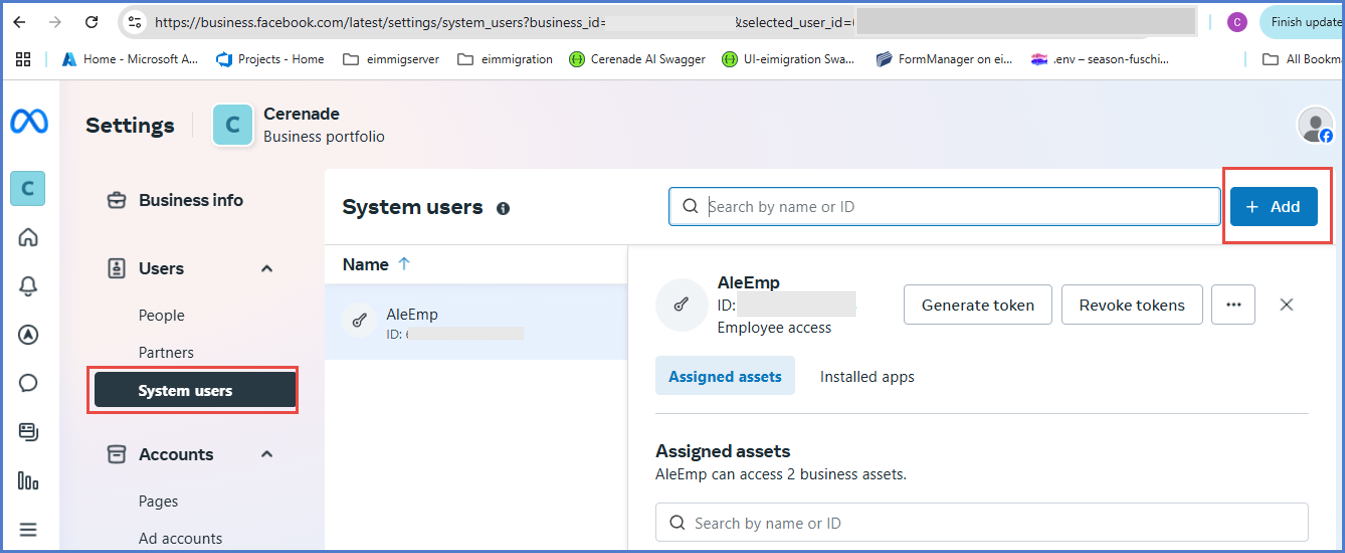
- Click + Add, enter a System Username, and choose Admin as the role.
- After creation, click the user’s name and then click Assign Assets.

- Assign your app system user with Manage App permission and confirm.
-
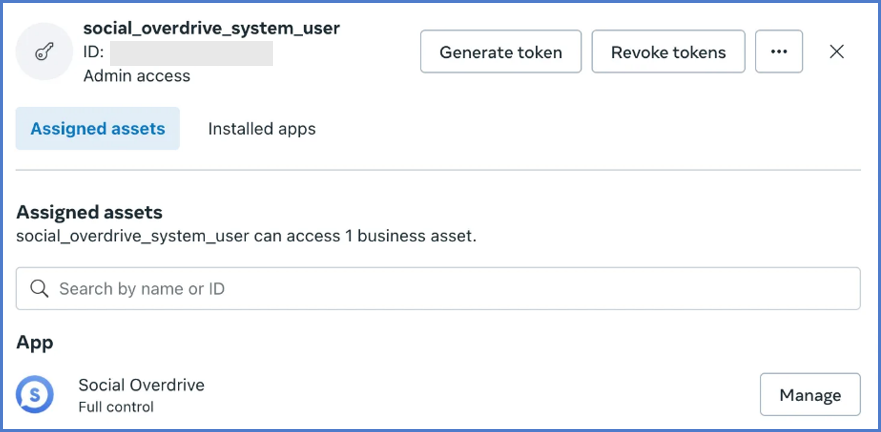
Once your user has Full Control, click Generate Token and:
- Select your app.
- Set token to never expire.
- Assign these permissions:

- business_management
- whatsapp_business_management
- whatsapp_business_messaging
- Click the Generate token button.
-
Copy the token and paste it into the corresponding field in Admin Portal → Application Settings → Messaging tab.
-
IMPORTANT: You must update this token in the admin portal each time you generate a new one.
-
SET UP A PAYMENT METHOD
-
To start conversations you will need to set up a payment method:
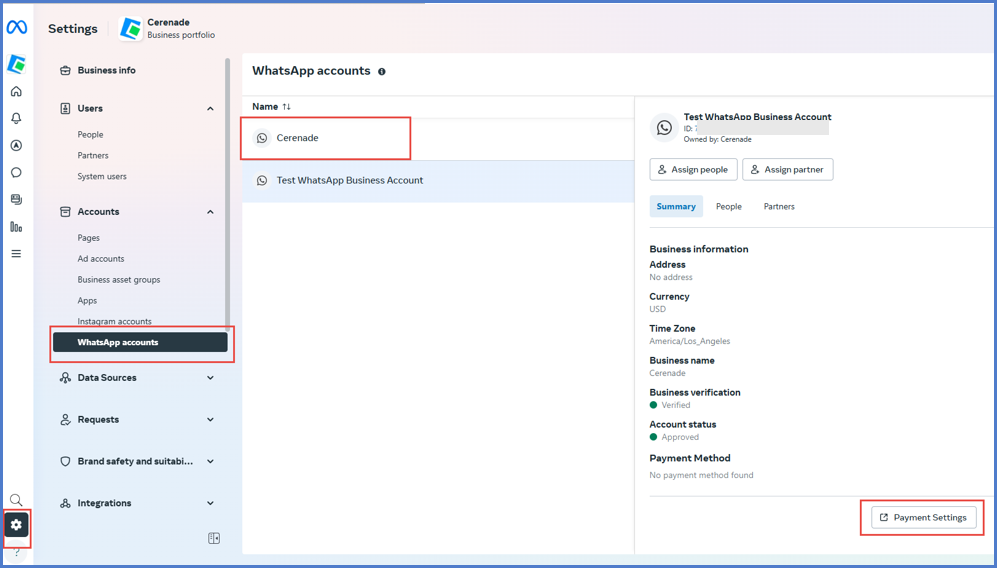
- Go to WhatsApp Accounts in your Meta Business Suite.
- Select your account → Click Payment Settings.
- Add a payment method.
SET UP AND CONFIGURE WEBHOOKS
- To receive messages:
- Go to https://developers.facebook.com/apps
- Select your App
- Expand the WhatsApp section and click “Configuration.”

- Fill in:
- Callback URL: https://www.eimmigration.com/[YourTenantName]/api/Tools/WhatsApp/webhooks
- Verify Token: A custom string of your choice. Enter the same string in your Admin Portal → Application Settings → Messaging tab.
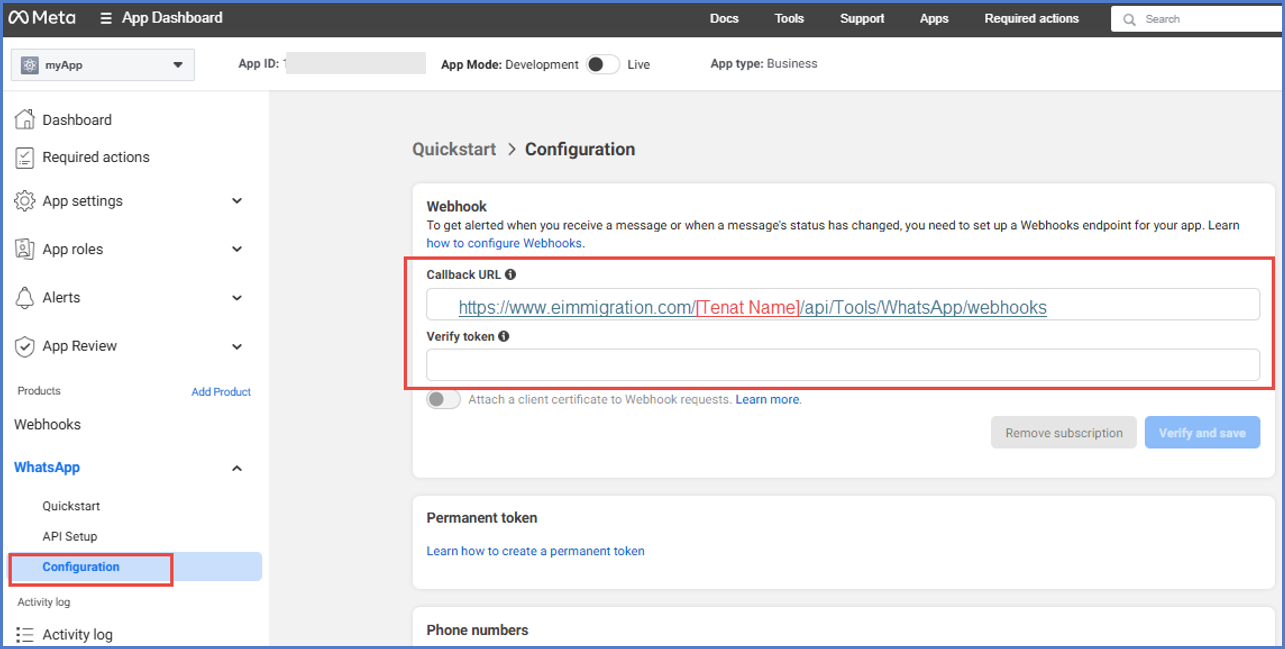
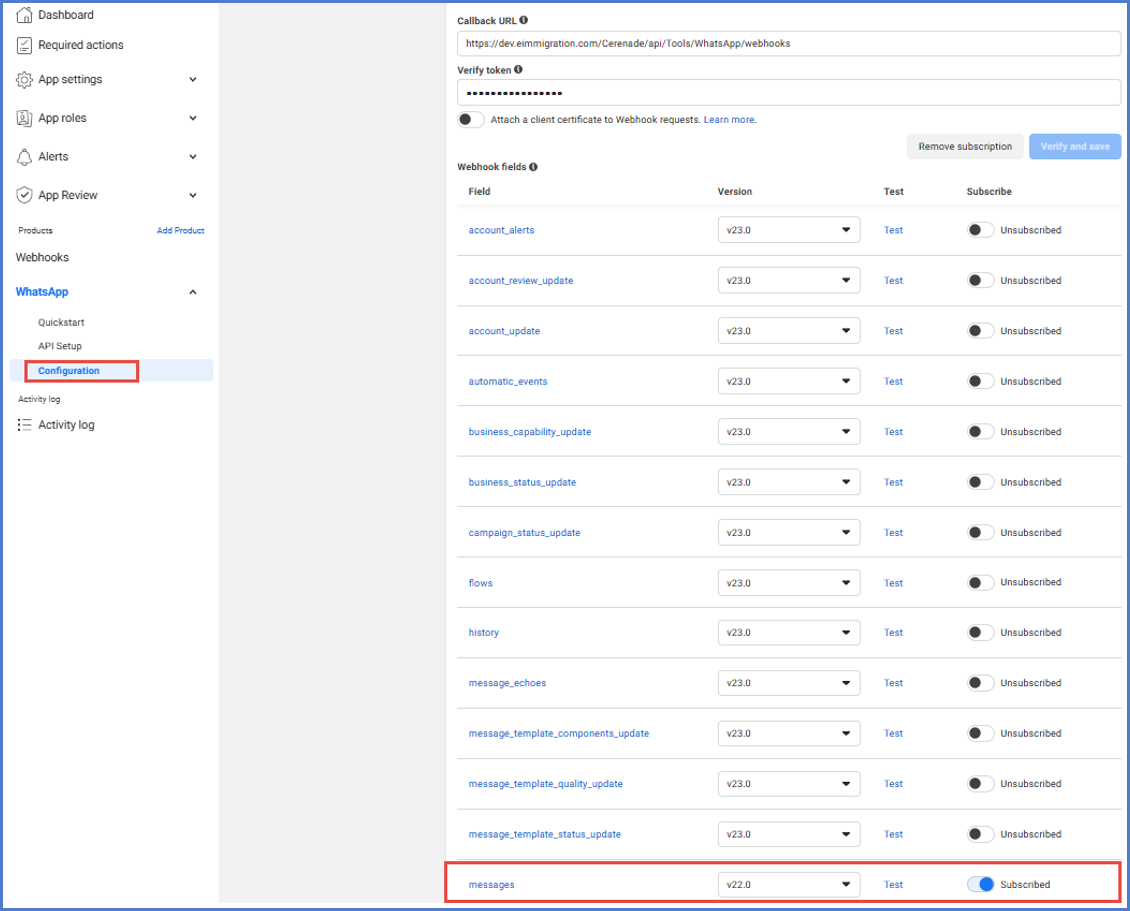
- Subscribe to Messages
APP SECRET
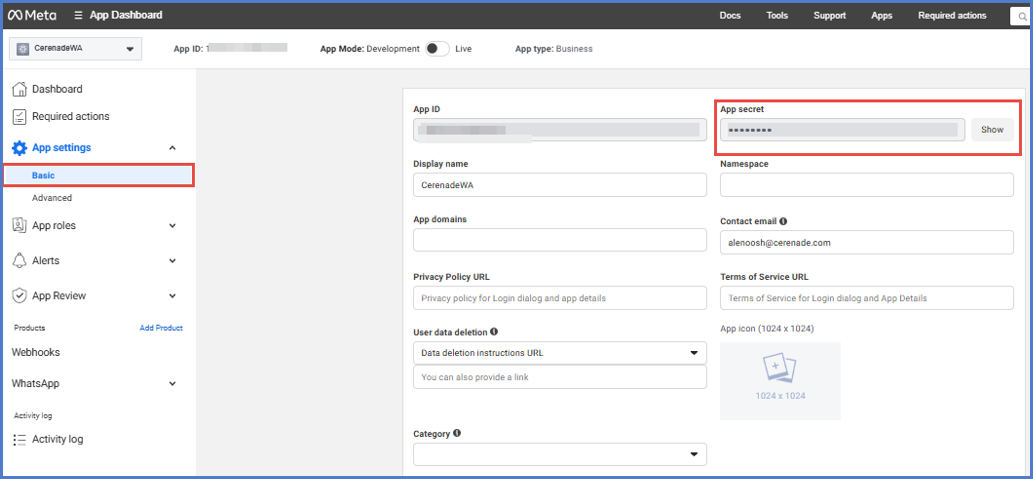
- In your developer account, go to My Apps or navigate to https://developers.facebook.com/apps/
- Select your app
- Expand App Settings and select Basic sub tab
- Click Show button for “App Secret”
- Re-enter your password
- Copy the App Secret and paste it into the corresponding field in your Admin Portal Admin portal > Application Settings > Messaging page.
Open a Service Window for Messaging
- To message a recipient:
- WhatsApp requires you to initiate contact with a template message
- Once they reply, a 24-hour service window is opened
- WhatsApp charges are based on these messaging windows https://developers.facebook.com/docs/whatsapp/pricing
- 💡 eimmigration automatically sends a template message when no open service window exists.
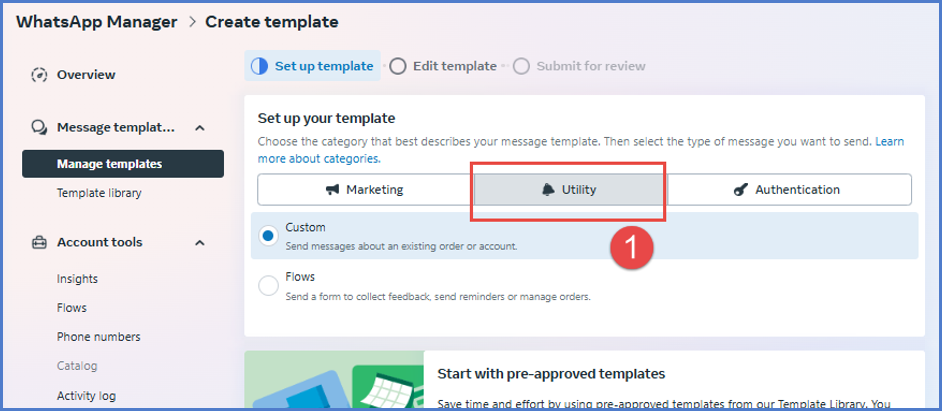
Create the Required Template Message
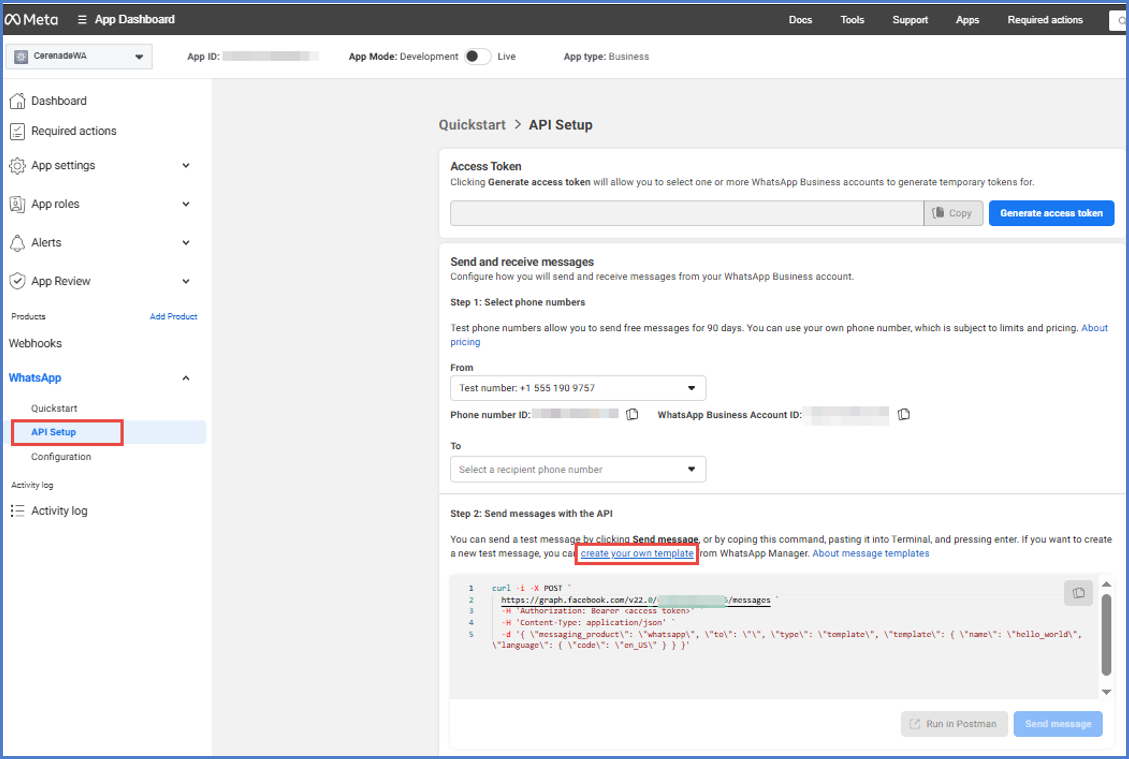
- Go to the WhatsApp tab in your Developer account select API Setup
- Click “Create your own template” or go to: https://business.facebook.com/latest/whatsapp_manager/message_template
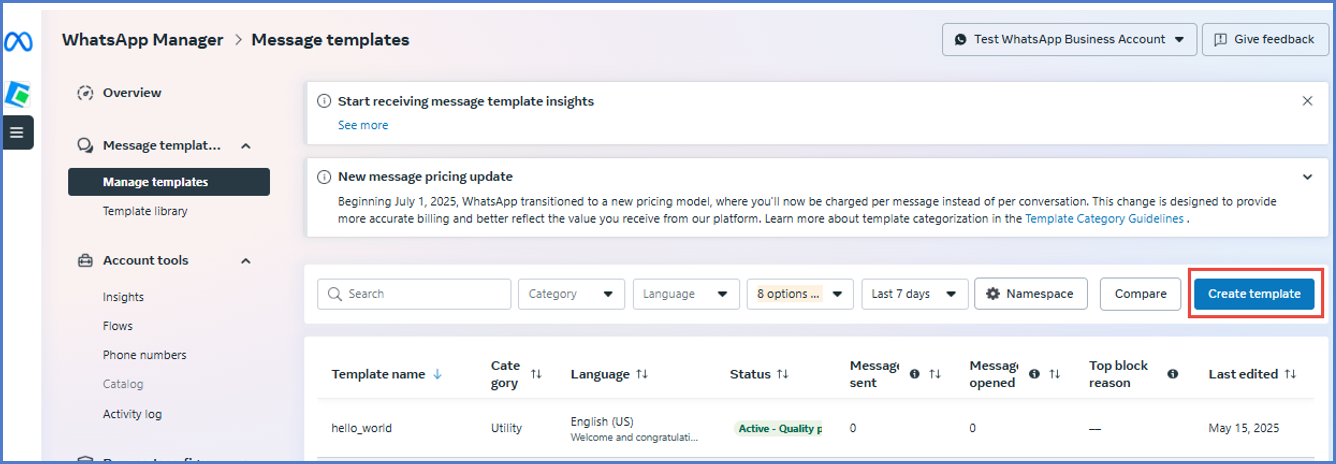
- Template Message Details
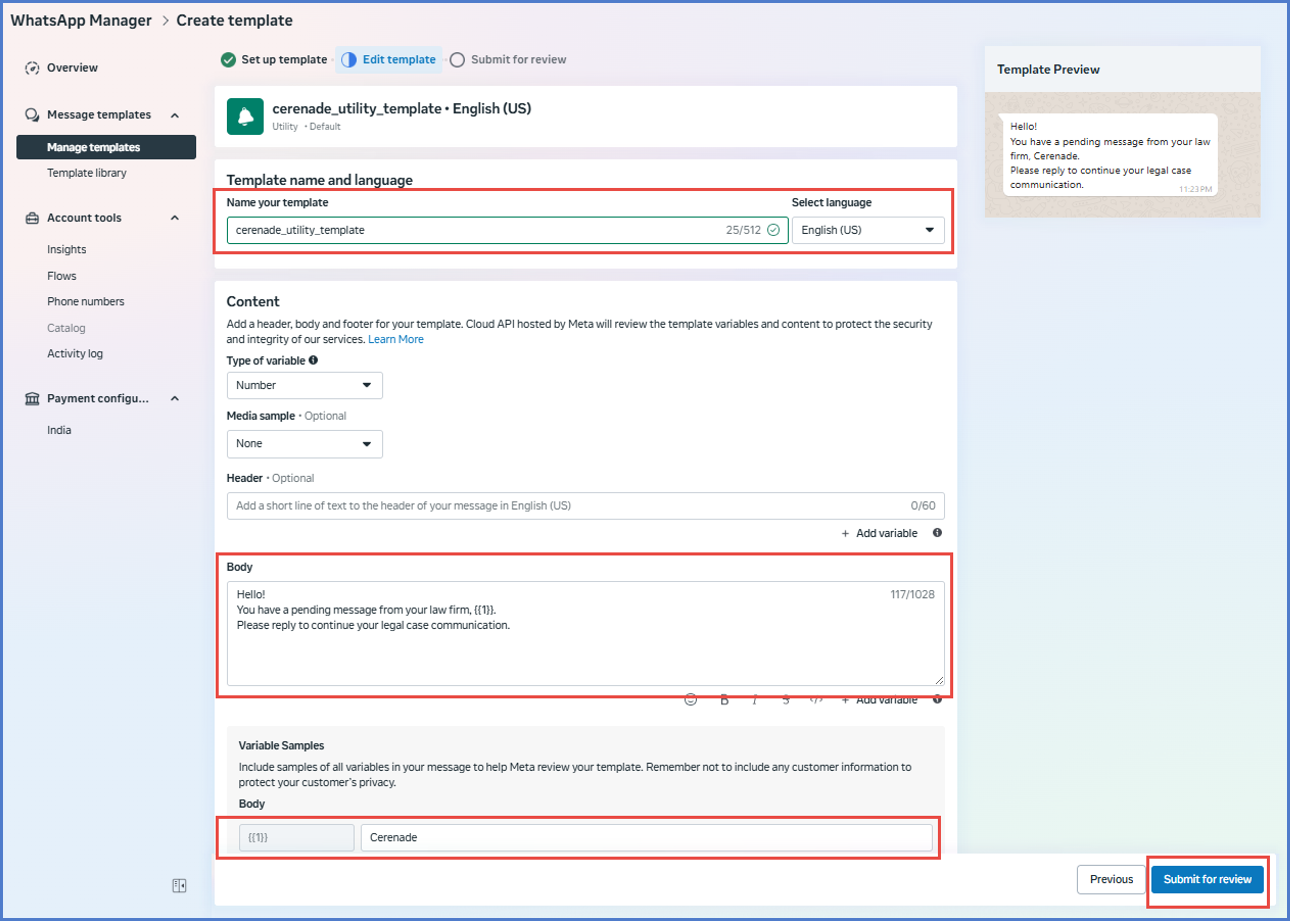
- Category: Utility
- Template Name: cerenade_utility_template
- Language: English (US)
- Body Message:
- Hello!
You have a pending message from your law firm, 1.
Please reply to continue your legal case communication.
- Hello!
- Sample Parameter: Your Tenant Name
- Click Submit for Review.
- Category: Utility